12V 2.1 Amplifier with TDA7377 / TDA7379
In this post, I want to make a single supply version 2.1 Amplifier that is cheap and can be supplied with a 12V-18V adapter or 12V battery.
This 2.1 amplifier already includes a lowpass filter for the subwoofer channel, and a 60Hz high pass filter on the stereo input channel (satellite) so that the satellite doesn't get too low a bass.
The final amplifier used in this amplifier module is the TDA7377/TDA7379. Here's the overall schematic of this TDA7377/ TDA7379 2.1 amplifier:
The following is the layout design of the 2.1 TDA7377 TDA7379 amplifier which was drawn by Barlex Respectaizer:The next step is to print the PCB on PCBWay, using the gerber file, this Amplifier gerber file can be downloaded at the end of the post.
By the way, PCBWay provides New Soldermask Colors - Pink, Gray, Orange, and Transparent.
Each additional choice in PCB manufacturing, means adding more customization for those of you who want to make PCBs on PCBWay, this is very important to interpret your project perfectly, especially for electronics enthusiasts and creative makers who like to show individuality.
PCBWay offers you the most options for creating unique products, such as color and material customization.
The new solder mask colors include PINK, ORANGE, GRAY, and even TRANSPARENT. What’s more, to meet some clients’ needs, we also release the “Black Core PCB” materials, so you can use them for your specific requirement. Now you can check all the available solder mask colors at the "Advanced PCB" online quote page, and we're excited to see your new boards with these new glamorous colors!
 |
| New Soldermask PCBWay |
Here is the PCB printed on PCBWay, I purposely printed it in blue to make it look cool.
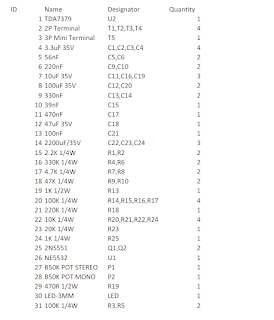
The next stage is to prepare the necessary components, namely:
After all the required components are available, the next step is to insert the components into the PCB one by one, then solder all components.The next stage is to prepare the necessary components, namely:
The 2.1 TDA7377/TDA7379 amplifier kit is complete and just a test. It's tiny and doesn't take up much space.
For those of you who want to know the sound, you can check the video below:
Download


Post a Comment for "12V 2.1 Amplifier with TDA7377 / TDA7379"
Dont use outgoing links!